Finally got back to making something, it was a while, but it felt nice.
The Back Story
A year or so ago my wife and I hosted a 30th birthday for a close friend. At our wedding 5 years ago, we rented a photo booth and all of our guests rejoiced, so now for the birthday we wanted one again. Unfortunately rental photo booths run around $1500 and that was way over our budget for the party. However, as I use Macs for work, I know there is a nice photo booth app that replicates everything a real photo booth does, except automatically printing out the pictures. I figured that if I could figure out how to make it automatically print, I could just use that.
So I dove in and began writing some code. Picture the hacking scene from ‘The Social Network’ as I researched OSX automator plugins, learned some AppleScript and then relearned ImageMagick in Perl to composite the 4 pictures Photo booth created into one picture. All in all, around 6 hours of hacking and the resulting script and AppleScript was hackerific. That left pretty much no time to set up beyond getting the mac on a table with my printer.
Photo booth 2.0
Word of my hack spread, and when my close friend Rob hit 40, his wife Tanya asked me to re-create the photo booth. Well, there were some problems, the biggest one, was that my ‘photo booth’ consisted of a table with my laptop and printer sitting on it. Not exactly what most people consider a photo booth. “Well,” I thought, “I have a weekend before this, why don’t I whip up a box?” I knew WeirdStuff Warehouse had flat screens really cheap, and I pictured screwing it into a wooden box would be easy. Finally I had an extra printer so this should be pretty cheap. I figured in the end $20 for a monitor and $50 of wood should get me a booth and it should just take a few hours.
The Plan
- Use my work mac and its photo booth software, hack it to auto print after each print
- Trigger the event by positioning the mouse cursor on the button and soldiering a push button to a USB mouse to ‘click’
- Create a simple box to hold everything, save time by only making the front ‘nice’. Attach a cheap flatscreen to it by cutting out a window.
- Profit
On a side note, I picked the hottest weekend of the year to do this all. It got up to 95 degrees and my garage was a sauna. I must have went through 3-4 t-shirts a day.
But, with four power tools purchased, 24 hours of sawdust and splinters, paint and cursing, one routing redo and one complete rewrite of my printing code; the box was completed. This is how it went down, I started on Saturday, The deadline was 4pm on Wednesday.
Day 1 – Saturday
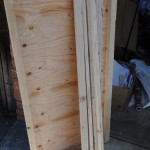
Off to Home Depot. I bought;
- 8 4′ 2×2 boards
- 8 4′ 1×2 boards
- a cheap sheet of 4’x8′ 3-py plywood that I had them cut into 4 2’x4′ pieces.
- a 2′ x 4′ birch 5-ply plywood for the front.
- a router
- a circular saw
- 2 caster wheels, as I planned on using two pieces of wood for the other supports and ’tilting and rolling it’ like luggage.
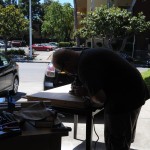
The first step was creating the box. I used 2×2 wood and the 3 ply plywood. I basically used the 2×2 as a platform for screwing in the plywood sheeting. I created two sides with this. I planned to use 3 of the 4 3-ply pieces for the sides, the other one I’d cut in two for the top and bottom
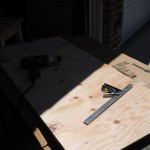
I then went and routed some openings for the monitor and the paper output in the nice birch plywood. Thinking I had steady enough hands and could sand out any irregularities I routed out the monitor port by hand and promptly messed up, it was way too uneven. I tried straightening it out by screwing in some 1×2 boards as guides. This worked somewhat, so I screwed in four pieces on the bottom to create a nice even cut. I used the 3/4 inch bit on the router and got a nice curved corner too. I then sat it up and noticed that all these runs with the router ‘evening’ out things made the monitor port all ‘wonky’. I tried to fix it, but messed it up further, by now I had enlarged the port too much and you could see too much of the monitor. I looked at what time it was, and I noticed it was 9pm and that there still was time for trip #2 to Home Depot before they closed and buy another piece. After the home depot run, I took some 1×2’s and made guides for both top and bottom and that was it for the first day.
Day 2 – Sunday (Pool Party)
I mentioned how hot it was right? Well, we have a pool and we were throwing a pool party and to top it off we invited the guest of honor for the surprise birthday party over. All of this was planned because I was ‘supposed’ to be finished, so I had to work around the party. I got up early (10am), and routed out the holes, I did a good job finally and then I had to clean up the seemingly cubic yards of sawdust created by doing this before people arrived.
We had a good day on the pool, and now I had a couple of hours to ‘finish’ the booth.
- I screwed in the ‘bad’ front temporarily to the sides I had created and anchored it all with 2x2s.
- I screwed in some metal braces to make it really secure.
I now had a pretty good solid frame of 2x2s, so I could take off the old front. I ended up cutting it into two pieces and screwed it into the top and bottom. The poorly cut out holes now became ‘Vents’. I screwed in some castor wheels to the bottom and noticed the idea of using ‘wood’ supports as the other to legs wasn’t going to work. I rigged up something to get it to balance, but it was rocky and hampered the rest of the build. I really should have done that last. I then worked on the back door with some hinges. That didn’t work out so right, the caster wheels were rolling the whole thing away. When I was finished the back door wasn’t closing properly so I just screwed it shut. I was looking at it fairly satisfied and my wife came out to tell me it was 9:30 and I probably should stop using power tools. 9:30? I thought I had just started.
Day 3 – Monday
I had to go into my day job and work but on the way home from work I hit HomeDepot where I picked up
- some polyurethane for the front and top as well
- various brushes and paint accessories
- two more caster wheels
- a lock to hold the back,
At home I got to work, I screwed in the caster wheels, and then noticed I had no shelves for the printer and computer. I cut up the 3-ply that was going to be the top and used it as shelves with some 2x2s. I then worked on the wooden support for the monitor. I got that all screwed in and it was time to test. My heart was racing but the monitor fit in well, and the printer was good out the bottom hole. I then went on the back piece and worked on the hinges again. I had to cut off a bit of the siding, and I used a dremel to cut out some wood so the lock would work. I screwed on the other casters as well. Looking at the time, it was almost 9:30 again. I dusted things a bit, then washed down the front, putting a coat of polyurethane on the wood.
Day 4 – Tuesday. 1 day to go.
Before work I went in and sanded down the front, then put another coat of urethane on it. I also forgot to put a coat on the top so I put one on.
After work I raced home. I put another shelf in for the computer, then I had to work on the ‘button’ that would click the mouse. I hadn’t even tested this, so I quickly put on a coat of primer and I fired up the soldering iron. I suddenly got afraid that the button would be a small metal bubble on the circuit board, but I found a nice little switch. I took apart an old mouse and soldered in my bigger red button in place of the left mouse button. I realized I needed a way to connect and disconnect the button so I could test it, then attach it through the front. I searched what I had available and I found 2 9 volt battery connectors. That worked perfectly. I tested it all out, including the monitor and the mac and it all worked.
Now I needed to paint the box, so I mixed up all of these testers we had lying around and painted it. We were testing a dark grey for our living room, so it worked perfectly. I went inside and I rewrote the code to print. It was around 1am when I finished and managed to test printing using the monitor in the front. Of course the monitor has buttons and the wood was hitting them, turning up the contrast and such. I marked that down as something to do.
Day 5 – Wednesday
Crunch time. In all of this I forgot to drill out a hole for the red button. I got up in the morning and found to my incredible distress that when I made the hole the drill was ripping up the wood. I tried again with the router and realized my hole was too close to the monitor support so the router wouldn’t cut through. Then I remembered I had that Dremel tool. I took off the support and dremeled out the hole a bit, then dremeled out a groove for the monitor buttons. Off to work. I came home at lunch, and quickly got to work. I tested the monitor, and the button on the front were still being pressed. I quickly super glued in some cardboard in front of the buttons and luckily, I repeat luckily, it worked. I then put everything together and realized I had 3 USB devices (mouse, camera and printer) and only 2 ports on the Mac. Many expletives were yelled, and thankfully my wife ran out to get me a usb bus. I took the assembled front and screwed it into the rest of it. My wife returned with the the usb hub and it all worked perfectly. The first successful test happened at 1:30pm on wednesday. I then loaded it into the car, Toyota Matrixes (pre 2010) are awesome at moving things, and went into work for a bit before heading to the party.
At the party it worked flawlessly.
Code for photobooth is here, https://github.com/johnboy55/photobooth
-
-
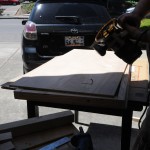
The wood
-
-
-
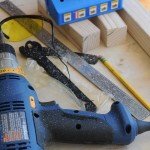
Big mistake, need to setup guides when routering
-
-
-
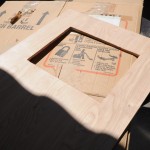
Looks good from here, bad up close, this ended up being the top of the box.
-
-

-

-
A Sample pic